Custom Actions with YeshID
Last updated: July 24, 2026
A custom action lets YeshID call an API endpoint of your choosing as part of provisioning — a single outbound HTTP request to any URL you specify, using the authentication you've already set up for that application's integration. If a tool YeshID doesn't have a built-in action for exposes an API (or you have an internal webhook or service), a custom action is how you drive it: create a user, add a license, post to a channel, kick off a downstream job — whatever that endpoint does.
Custom actions are a good fit when the built-in provisioning actions (Create User, Delete User, and so on) don't cover something you need, and the app or service has an API you can hit. You define the action once on the application, then drop it into your onboarding, offboarding, or application workflows so it runs automatically at the right moment.
Plan note: Custom actions are a Business Plan feature. If the Custom Actions section doesn't appear on an application, reach out to your YeshID contact.
What it gives you
Reach any endpoint — provision or trigger anything with an API, not just the tools YeshID has built-in actions for.
Run it automatically in a workflow — a custom action runs as an automated task, so it fires as part of onboarding, offboarding, or an application workflow with no one having to click anything.
Use real context in the request — inject the person being onboarded, their account, role, and workflow details into the URL, headers, or body using template variables.
Reuse your integration's auth — the request goes out using the authentication you configured for that application's integration, so you're not managing separate credentials per action.
Key terms
Term | What it means |
|---|---|
Custom action | A provisioning action you define yourself that makes one HTTP request to an endpoint you specify. It lives on a specific application. |
Endpoint URL | The full URL the custom action calls. Absolute URLs are used as-is; a relative path is joined to the integration's base URL. |
Method | The HTTP method for the request — GET, POST, PUT, DELETE, or PATCH. |
Template variable | A placeholder like |
Enabled | Whether the action is turned on. A newly created custom action starts disabled — turn it on when it's ready to run. |
Run provisioner action for user | The workflow task that runs a custom action. This is how a custom action gets included in a workflow. |
Where to find it
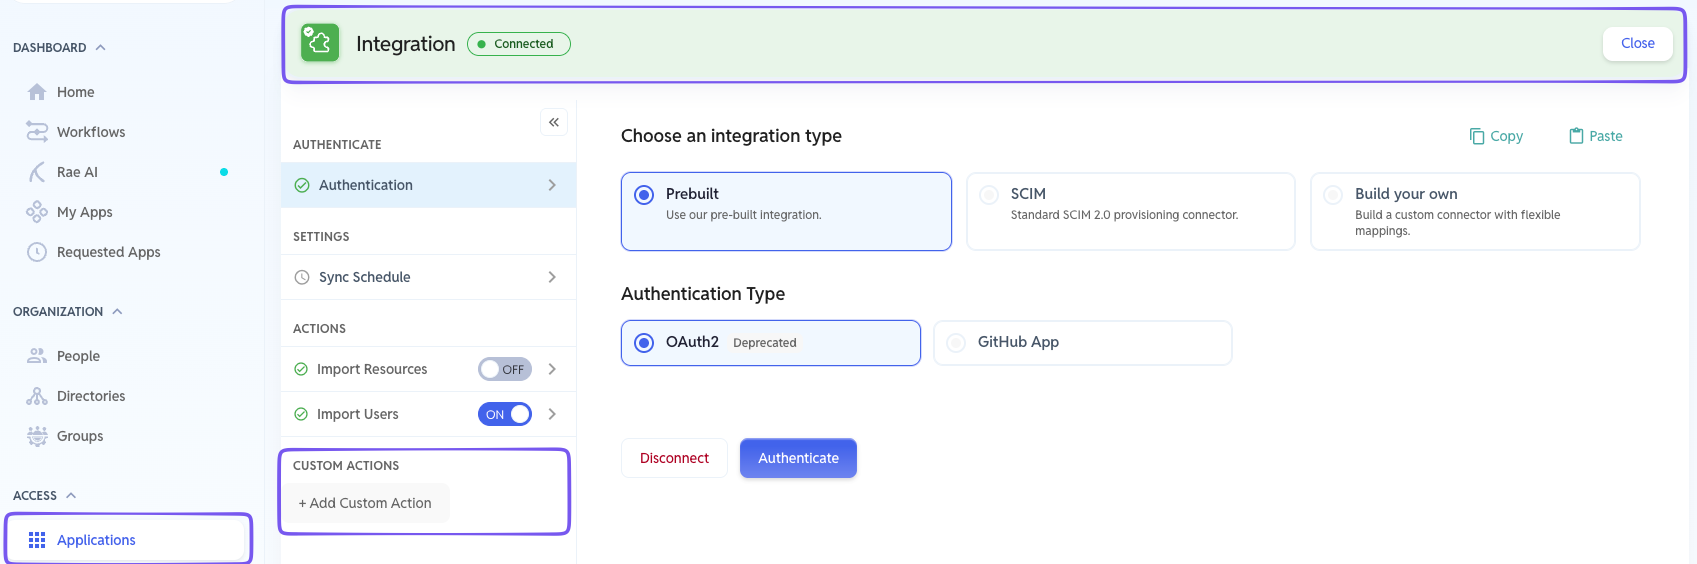
Custom actions live on an individual application's integration settings, not in a global menu.
Go to Applications and open the application you want to add the action to.
Click into the Integration bar.
In the left-hand nav, look for the Custom Actions section. (It appears once the integration is authenticated and your plan includes custom actions.)
The nav on this page is organized into Authenticate, Settings, Actions (YeshID's built-in actions), and Custom Actions (yours).
Creating a custom action
In the Custom Actions section, click + Add Custom Action.
In the Add action dialog, give it an Action Name (required — a unique name to identify it) and an optional Description. Click Add.
On the action's setup form, configure the request:
Method — the HTTP method (GET, POST, PUT, DELETE, PATCH).
Endpoint URL — the full URL of the endpoint to call.
Advanced (expandable) — add URL Parameters, Headers, and a request Body as needed.
Use Test to send a trial request and check the response before relying on it. (Generate Config can help scaffold the request.)
Enable the action when it's ready. New actions start disabled, so a half-configured action can't run by accident.
Authentication: the request goes out using the authentication configured for the application's integration. Authentication set up for custom actions applies only to custom actions — built-in directory actions (Import Users, Create User, Delete User) keep using directory-managed auth.
Using template variables
You don't have to hard-code values in a custom action. Template variables are placeholders like {{.User.Email}} that YeshID fills in at runtime with the actual person, account, role, and workflow the action is running for — so one action works for everyone the workflow runs for. You can use them in the Endpoint URL, URL Parameters, Headers, and Body.
In the action editor, type {{ to trigger autocomplete — YeshID shows the live list of variables available for your org, including your own custom fields, so you don't have to memorize them.
The names are exact. A wrong or unavailable variable makes the whole request fail rather than rendering blank — so pick from the {{ autocomplete and use Test before enabling an action.
User — {{.User.*}}
Details of the person the workflow is running for. Always available.
Variable | What it is |
|---|---|
| First name (there is no |
| Last name. |
| Full name. |
| Primary email. |
| Recovery email. |
| The user's manager's email (also |
| Start / end dates. |
| User status. |
| Whether the user is external (true/false). |
| YeshID user ID. |
Custom fields are keyed by their display name (which can contain spaces), so they need the index function rather than dot syntax:
Adding a custom action to a workflow
A custom action doesn't run on its own — you include it in a workflow with the Run provisioner action for user task. This task is available in onboarding, offboarding, and application workflows.
Open the workflow template you want to add the action to (or create a new one).
Add a task and choose /Run provisioner action for user.
Configure the task's parameters:
Application — the application the custom action belongs to. (Picking the application loads its available actions.)
Action — the specific custom action to run.
Directory identity (optional) — the account name to run the action for. If left blank, the person's email is used.
Position the task where it should run in the workflow, and save.
The task runs automatically — there's no human assignee. When the workflow reaches it, YeshID resolves the account, fills in any template variables, and sends the request.
Adding a custom action to application workflows
The Run provisioner action for user task is also available in application workflows (the provisioning workflows tied to a specific application). This lets an application handle its own provisioning steps through a custom endpoint.
The steps are the same as above: in the application's workflow, add a Run provisioner action for user task, then pick the Application and the Action. This is a common pattern when an app's provisioning needs a call the built-in actions don't cover — you build the custom action on that application and wire it straight into the app's own workflow.
How the request behaves
One request per run. Each time the task runs, the action sends a single HTTP request to the endpoint.
Success and failure. A response in the 200–299 range is a success. Any other status code fails the task, and the failure surfaces on the workflow. YeshID records the response so you can see what came back.
Disabled or missing actions. If the action is disabled or can't be found, the task fails rather than silently doing nothing — another reason to enable an action only once it's ready.
Secrets are protected. Parameter values marked as secret are encrypted and scrubbed from stored responses.
Tips and good habits
Test before you enable. Use the Test button to confirm the endpoint responds the way you expect, then turn the action on.
Lean on template variables. Hard-coding a user or account defeats the purpose — use
{{.User.*}}and friends so one action works for everyone the workflow runs for.Name actions for what they do. The action name is what you'll pick from the Action dropdown in the workflow builder, so make it obvious ("Deactivate in Billing System" beats "Custom action 1").
Watch the status code contract. If your endpoint returns a 2xx on partial success, the task will look successful — make sure the endpoint's response codes mean what you think they mean.